The basics in 60 seconds
You recorded one event on several devices — say two cameras and a voice recorder. Each was started at a different moment, so the same event happens at a different time in each file. This app works out those differences and gives you back files that all start at the same instant.
- Add your recordings with Add Media.
- Align them with one button — Align every track.
- Check by pressing Space to play them all together.
- Export with the upload-arrow button, and choose a folder.
A few words you'll see throughout the app and this guide:
- Track
- One recording (one file) in your project. Each track has its own colour.
- Timeline
- The strip at the bottom where every track is laid out against a shared clock, drawn as a sound wave.
- Playhead
- The thin vertical line on the timeline showing the moment you're looking at.
- Reference track
- The recording every other track is lined up against. Usually your best-quality camera or microphone.
- Offset
- How many seconds after the start of the timeline a track begins. Aligning sets this for you.
- Drift
-
How far a device's clock runs fast or
slow, shown as seconds per hour (for
example
+1.93 s/h). The app corrects it on export. - Marker
- A small flag pinned to a moment in a track — placed by the app where it found a match, or by you.
- In / Out points
- Optional start and end points that limit which part of the event is exported.
1 · Install & first launch
Download the installer for your computer from the download page and open it.
| Computer | What to do |
|---|---|
| Windows |
Run the .exe. The app
installs and opens by itself. It
then appears in the Start menu.
|
| macOS |
Open the .dmg and drag
the app onto the
Applications folder
shown beside it. Then open it from
Applications or Launchpad.
|
| Linux |
Open the .deb with your
software installer, then launch the
app from your applications menu.
|
Set up ffmpeg (one click)
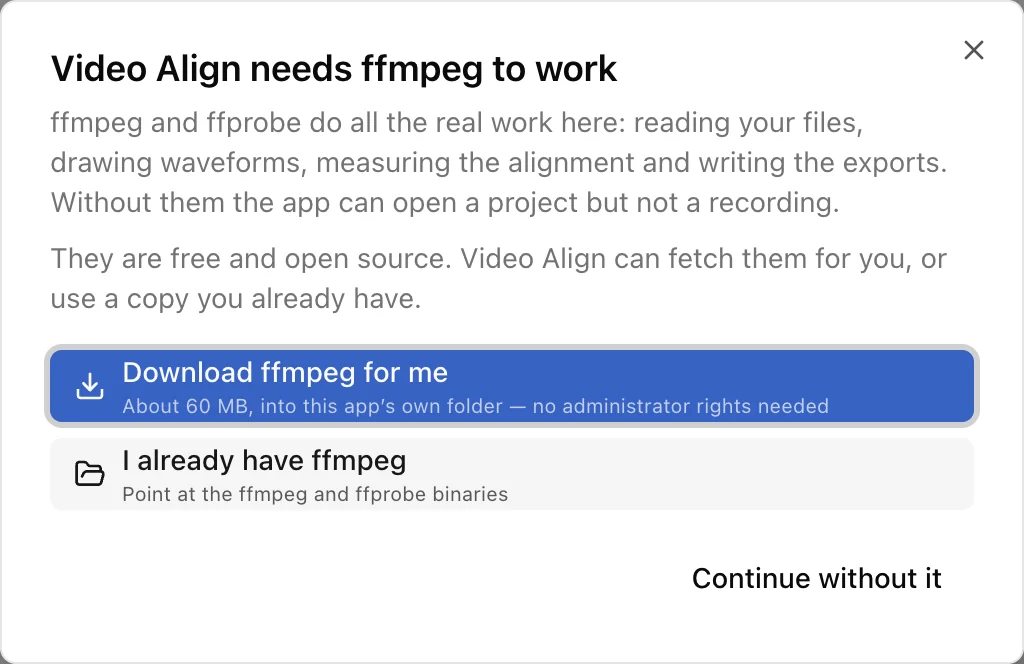
The app uses ffmpeg, a free and trusted tool, to read and write audio and video. If your computer doesn't already have it, a window appears the first time you open the app:
| Choice | When to pick it |
|---|---|
| Download ffmpeg for me | Recommended. Downloads about 60 MB into the app's own folder. No administrator password needed. Takes a minute or two. |
| I already have ffmpeg |
If ffmpeg is already installed,
you'll be asked to pick the
ffmpeg file and then
the ffprobe file.
|
| Continue without it | Opens the app, but recordings can't be read until ffmpeg is set up. You can do it later from the message in the bottom-right corner. |
2 · A tour of the window
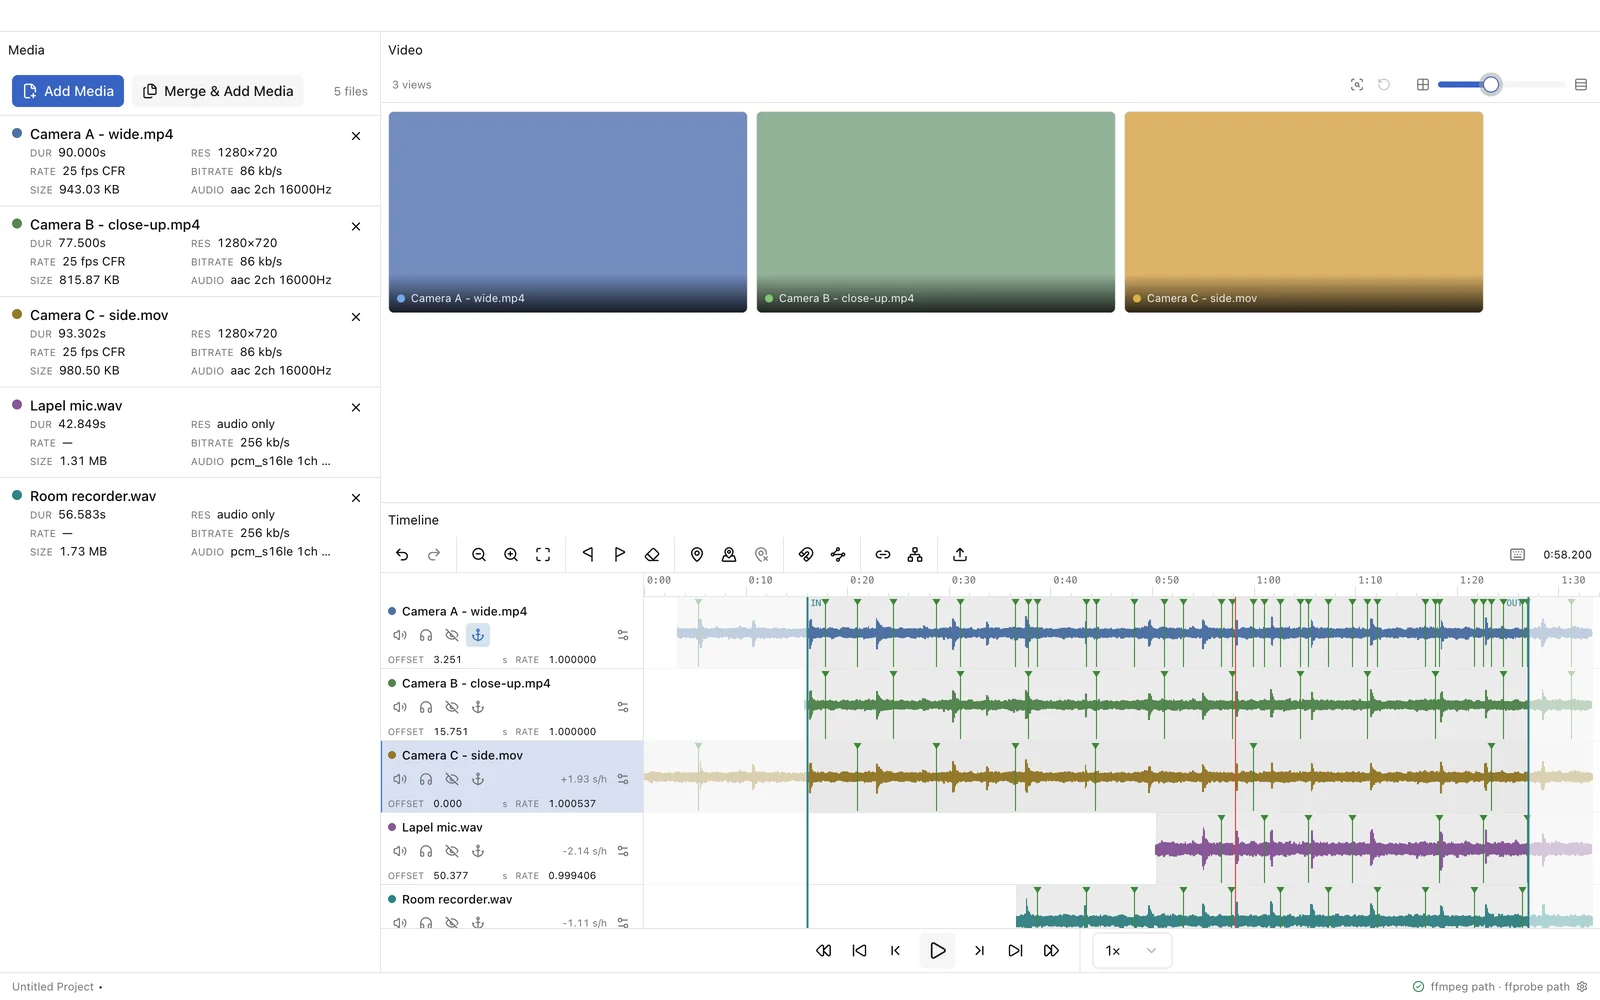
The window is split into three areas, plus a status bar along the bottom.
| Area | What it's for |
|---|---|
| Media (left) | The list of recordings in your project, with details such as length, picture size and sound format. |
| Video (top right) | Every camera angle, playing together. |
| Timeline (bottom right) | Every recording drawn as a sound wave on a shared clock. This is where you align, check and choose what to export. Playback controls sit underneath it. |
| Status bar (bottom edge) | Your project name (a dot • means unsaved changes), export progress, a notice when an update is available, and whether ffmpeg is ready — click it to open Preferences. |
You can resize the areas by dragging the borders between them, and rearrange them by dragging their title tabs. The app remembers your layout.
3 · Add your recordings
Click Add Media at the top of the Media list (or choose File → Add Media…) and select every recording of the event. You can select several files at once, and add more later.
| Kind | File types |
|---|---|
| Video |
.mp4
.mov
.m4v
.mkv
.avi
.mts
.m2ts
.mxf
.webm
|
| Audio |
.wav
.aif
.aiff
.mp3
.flac
.m4a
.aac
.ogg
.opus
.caf
|
Other formats that ffmpeg understands usually work too — choose All Files in the file picker.
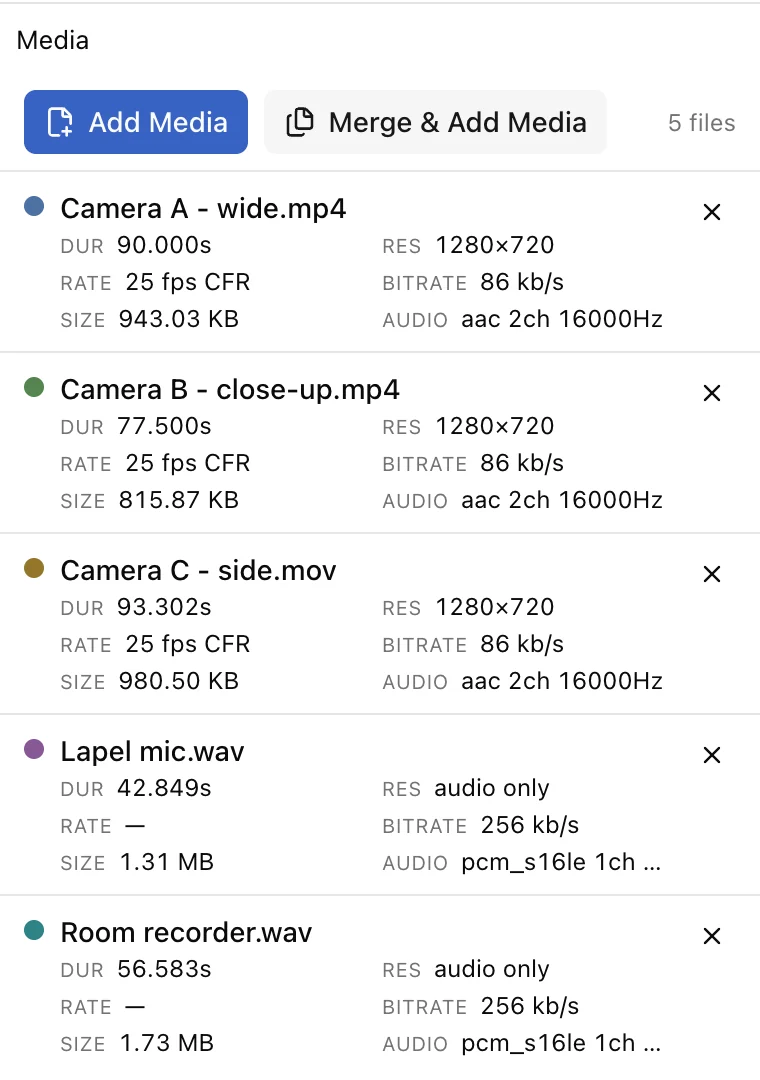
- A small progress bar appears under each new file while the app reads its sound. This only takes a few seconds for most files.
- Reorder tracks by dragging a file up or down the list. The timeline and video views follow.
- Remove a file from the project with the × beside it. The file on your computer isn't touched.
- "No audio — cannot be auto-aligned" means the file has no sound. You can still line it up using markers or by hand.
-
"Previewing via …" means the format
can't be played directly (common with AVCHD
.mtscamcorder files), so the app made a lightweight preview copy. Alignment and export always use your original file.
Joining files a camera split up
Action cameras (GoPro and others) and some camcorders split a long recording into several files of a few minutes each. Join them into one before aligning, using Merge & Add Media.
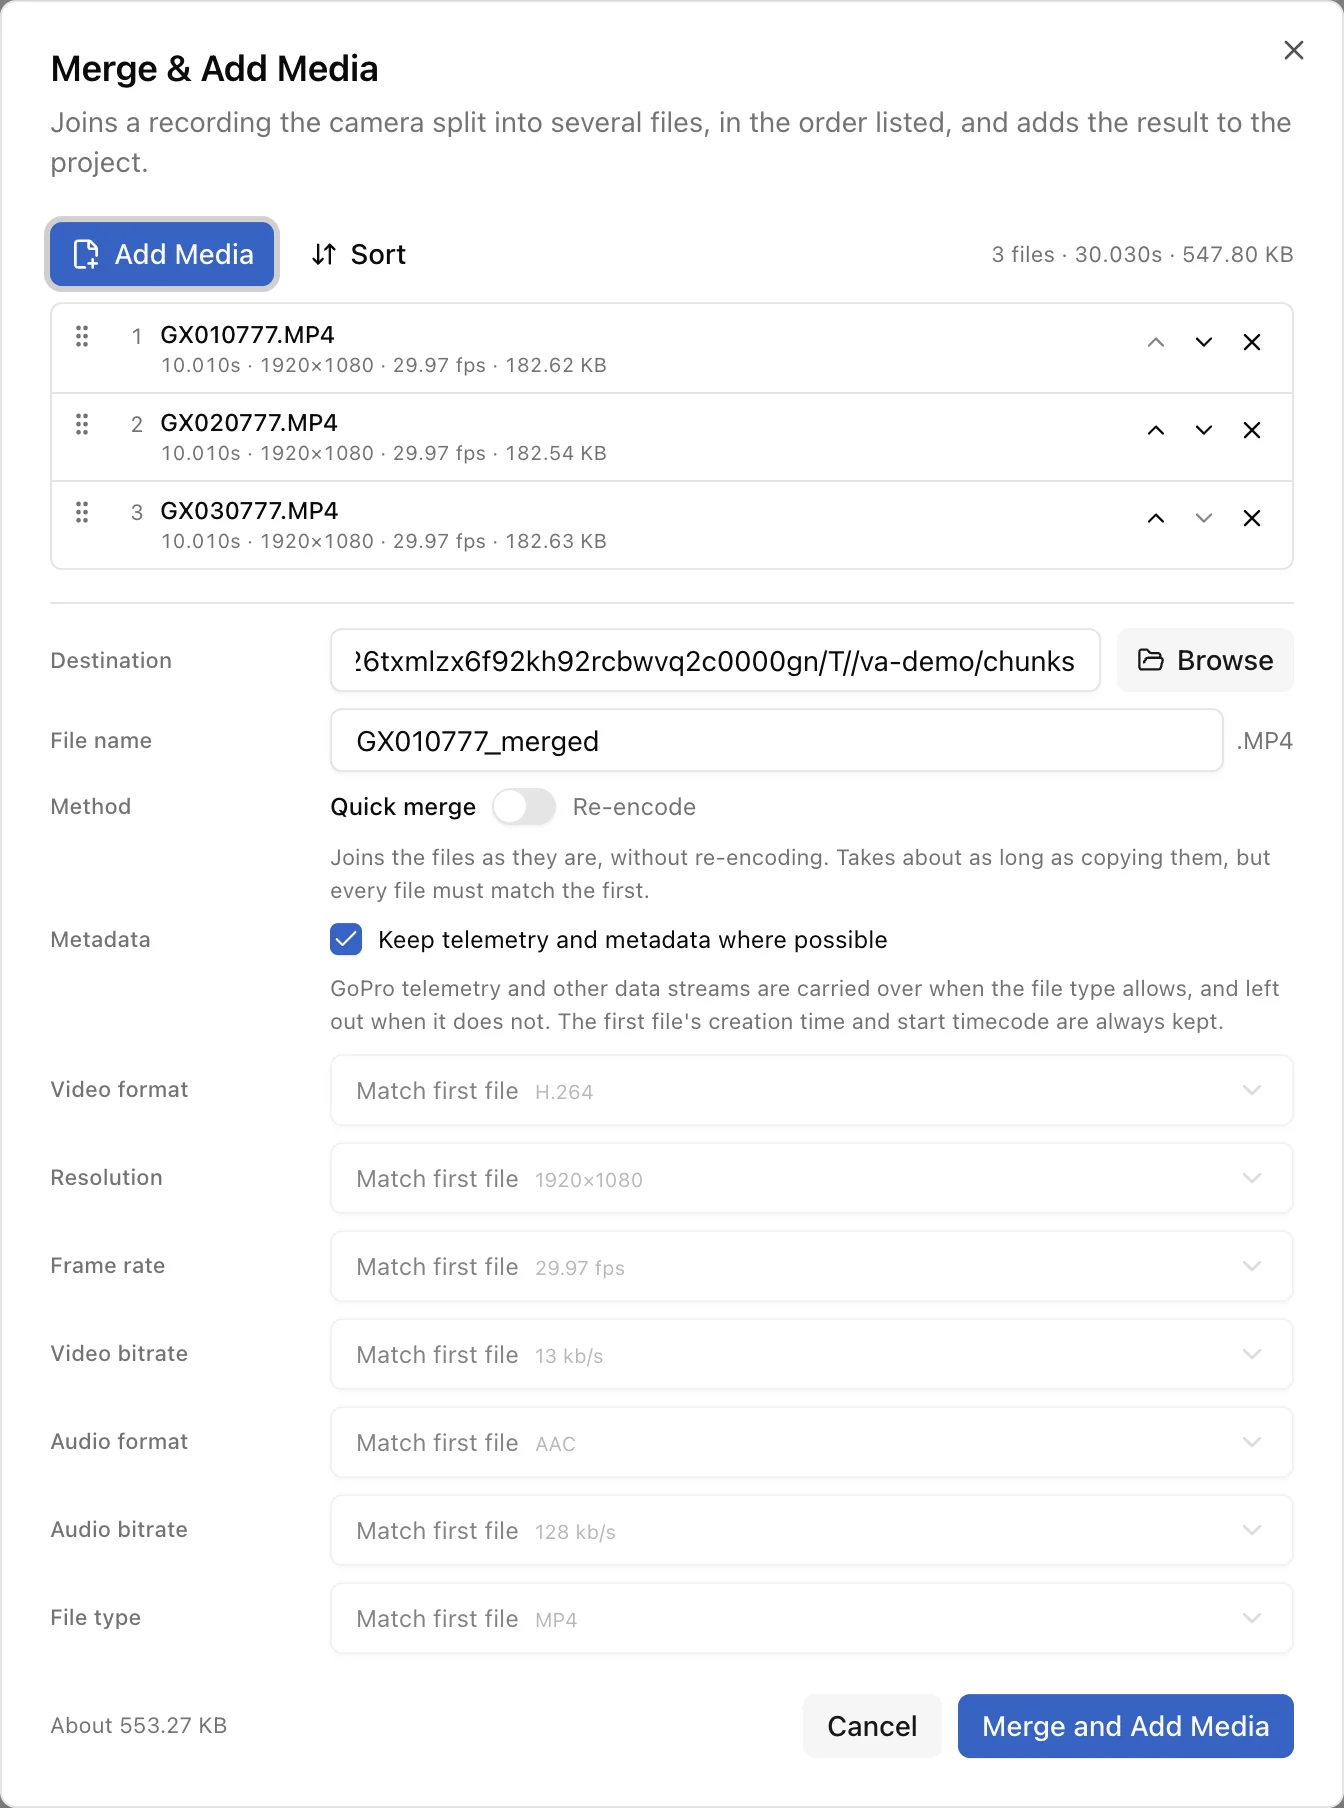
- Click Merge & Add Media, then Add Media in the window that opens, and select all the pieces of one recording.
- Check the order. The app sorts the pieces into recording order automatically (GoPro file names don't sort correctly on their own). If needed, drag them, use the arrows, or click Sort to restore the automatic order.
- Check the Destination folder and File name for the joined file. The app warns you if the folder doesn't have enough free space.
-
Choose a Method:
- Quick merge (default) joins the pieces as they are. Fast — about as long as copying the files — with no loss of quality. All pieces must come from the same camera settings.
- Re-encode creates a completely new file. Much slower, but works even if the pieces differ. The format, resolution, frame rate and quality settings below become available; if pictures have different shapes, choose Fit (black bars), Fill (crop the edges) or Stretch.
- Leave Keep telemetry and metadata on to carry over GPS and motion data from cameras that record it, where the file type allows.
- Click Merge and Add Media. When it finishes, the joined file is added to your project. You can cancel at any time and return to the window with your choices intact.
4 · Align automatically
Automatic alignment compares the sound in each recording with the sound in the reference track, and moves each track to where it matches. It works whenever the microphones heard the same things — they don't need to sound identical.
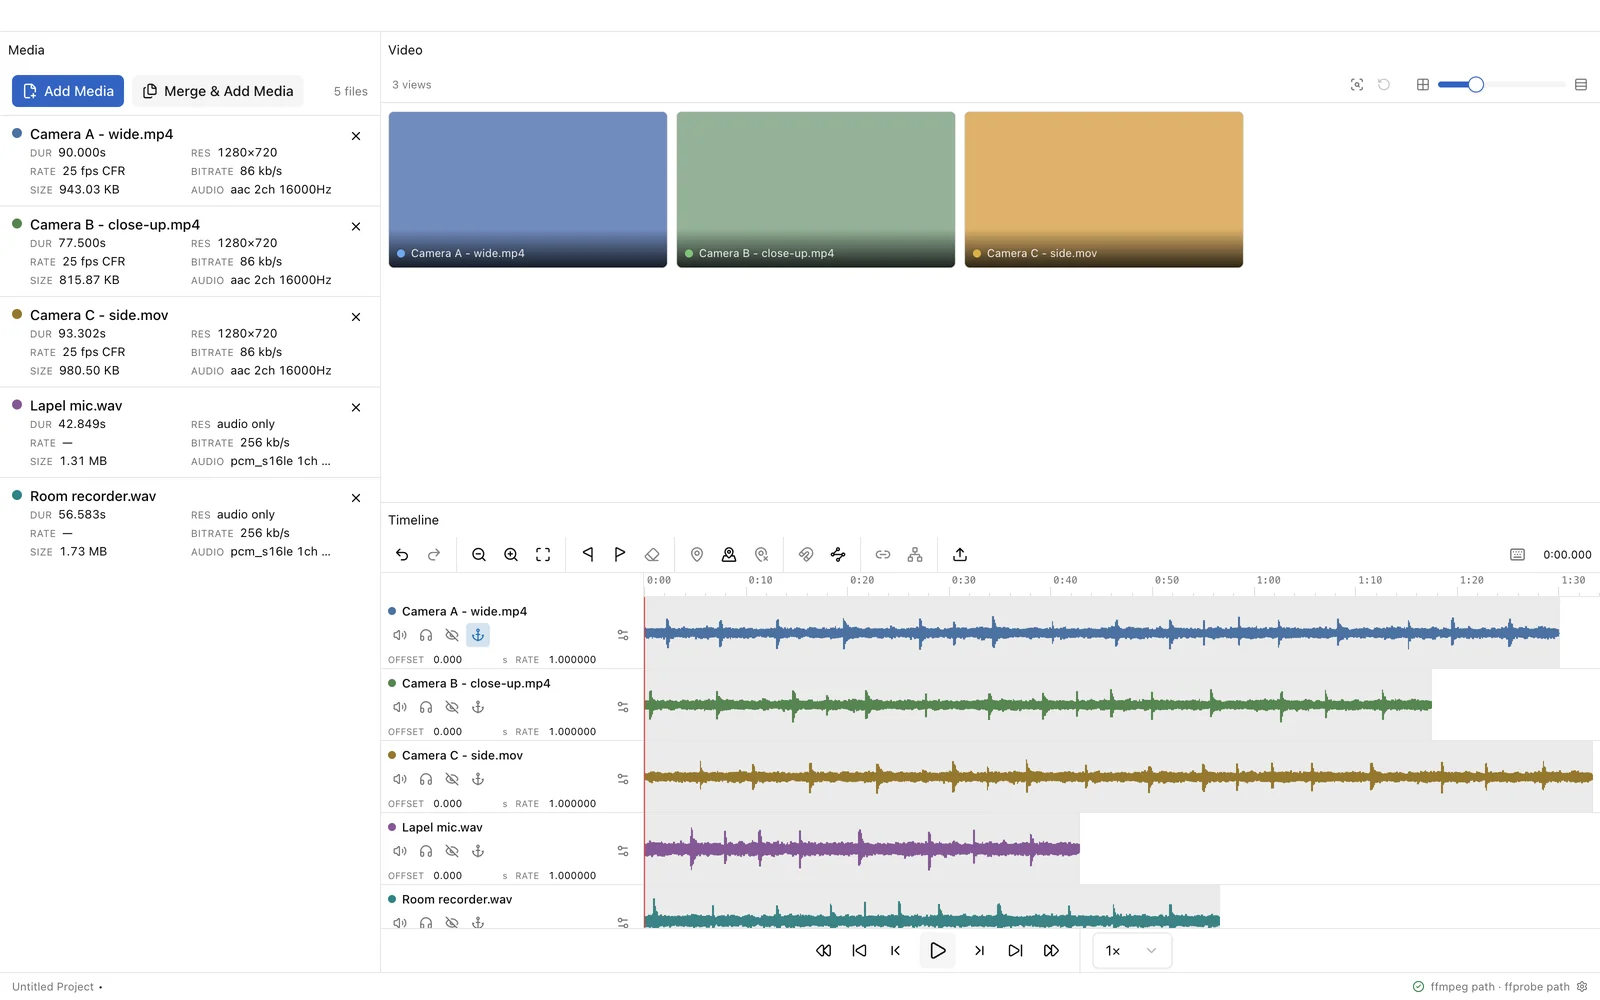
- Choose the reference track (optional). The first recording with sound is used unless you pick another: click the anchor button on the track's header in the timeline. Pick the recording with the clearest sound, ideally one that runs for the whole event.
- Click "Align every track" in the timeline toolbar (the button with a zig-zag path, just right of the magnet). To align a single recording instead, click its header to select it, then click the magnet button.
- Wait a moment. Progress is shown in the toolbar, and can be cancelled with the ×. A few minutes of audio typically takes seconds; long recordings take longer.
- Read the report that opens when it's done (see below). The timeline zooms out to show the whole, aligned project.

| Buttons (left to right) | What they do |
|---|---|
| Undo · Redo | Step back or forward through your changes. |
| Zoom out · Zoom in · Fit | Change how much of the timeline is visible. Fit shows the whole project. |
| Set In · Set Out · Clear | Mark where the export should start and end, at the playhead. Clear removes them and any selection. See Export. |
| Add marker · Mark every track · Delete marker | Place and remove markers. See Sync using markers. |
| Align active track · Align every track | Automatic alignment from sound (magnet, then zig-zag path). |
| Sync active track from markers · Sync every track from markers | Alignment from markers you placed (chain link, then branching icon). |
| Export | Opens the Export window. |
| Keyboard (far right) | Shows the list of keyboard shortcuts. The time beside it is the playhead position. |
Reading the alignment report
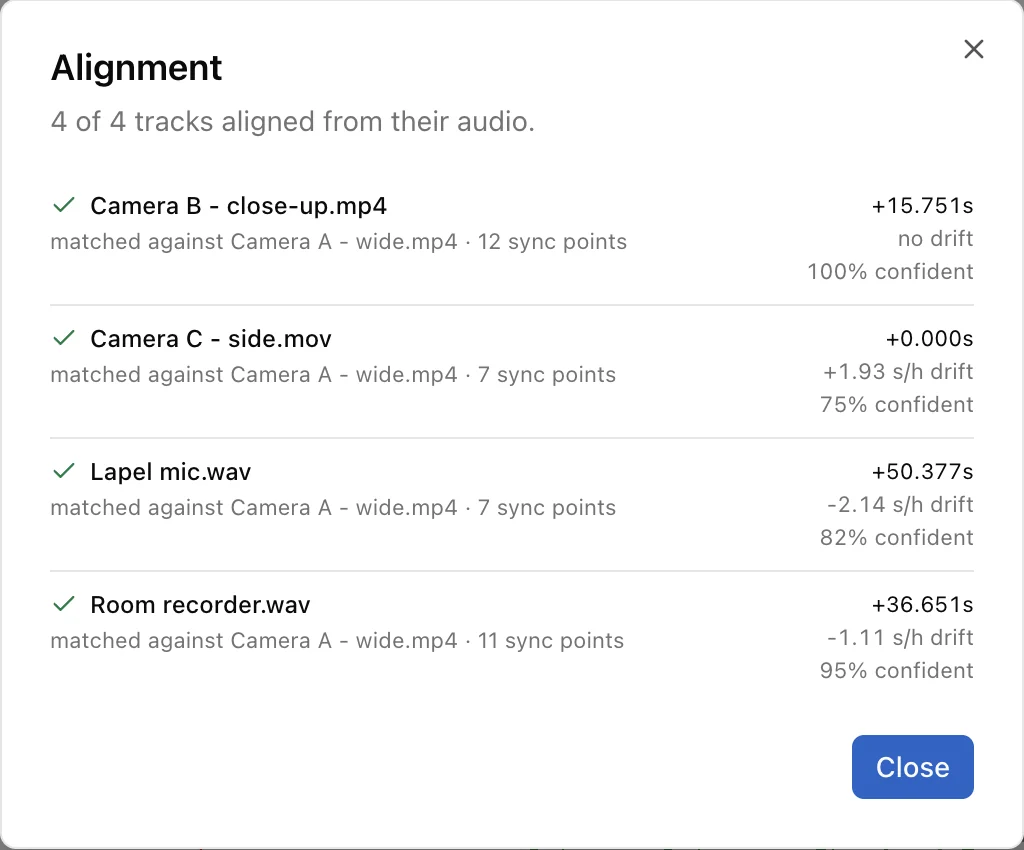
| You see | It means |
|---|---|
| ✓ green tick | The track was matched and moved into place. |
| ⚠ amber warning | No reliable match was found, so the track was left where it was. The reason is given underneath. |
+15.751s |
Where the track now starts on the timeline. |
12 sync points |
How many separate moments agreed. More is better. |
+1.93 s/h drift |
This device's clock gains 1.93 seconds every hour compared with the reference. It's corrected automatically; no drift means the clocks agree. |
95% confident |
How clearly the sound matched. High numbers are reliable; if a track is low, give it a quick listen. |
The moments that were matched stay on the timeline as small markers, so you can jump to any of them later and confirm by eye and ear.
5 · Check the result
Play the project and watch and listen: lips should match voices, and claps or door slams should happen at the same moment in every view.

- Play / pause with the middle button or Space. The buttons either side jump back or forward by one frame, 5 seconds or 30 seconds. The menu on the right changes playback speed (¼× to 8×).
- Jump to a moment by clicking anywhere on the timeline, or drag along the time ruler above the tracks to scrub.
- Zoom the timeline with the toolbar buttons, the + / − keys, or by holding Ctrl (⌘ on Mac) and scrolling. Press F to fit everything.
- Jump between markers with , and . to hear the matched moments one after another.
Controls on each track

| Control | What it does |
|---|---|
| Speaker — Mute | Silences this track while playing. |
| Headphones — Solo | Plays only this track's sound (you can solo several). Handy for comparing two microphones. |
| Crossed-out eye — Disable | Leaves the track out of playback, which helps on slower computers. |
| Anchor — Reference | Makes this the track others are aligned to. |
+1.93 s/h |
The clock drift found for this track. Hover for details. |
| Sliders icon — Export settings | Format and quality for this track's exported file. See Format & quality. |
| Offset and Rate | The exact start time and clock correction. Normally set by aligning, but you can type a new value and press Enter (Esc cancels). |
Click a track's header to make it the active track (highlighted with a bar on its left edge) — buttons like Align active track act on it. Hold Ctrl / ⌘ or Shift while clicking to select several tracks. Drag a header up or down to reorder tracks.
6 · Sync using markers
Use markers when automatic alignment can't find a match: a camera with no microphone, recordings made in different rooms, or very noisy sound. You mark the same real moment in each recording, and the app lines the marks up.
Good moments to mark are short and obvious: a hand clap, a clapperboard, a camera flash, a door closing, a light switching on.
- Find the moment in the first recording. Click the track's header to make it active, then move the playhead to the exact moment — use ← / → to step one frame at a time.
- Add a marker with the pin button in the toolbar, or press M.
- Repeat for each recording, marking the same moment in each. It doesn't matter where the tracks currently sit on the timeline.
- Click "Sync every track from markers" (the branching icon in the toolbar), or select one track and use Sync active track from markers (chain link).
-
Read the report. For each
track it shows how closely the marks agree,
for example
±2.1 ms, and warns if one marker is far from the others.
- Put the same number of markers in the same order on every track — the first marker on one track is matched with the first on the others, and so on.
- For long recordings, mark one moment near the start and one near the end. Two markers far apart let the app measure and correct clock drift too.
- If the tracks are already roughly lined up, press Shift+M to drop a linked marker on every track at the playhead, then drag each one onto the exact moment.
- Move a marker by dragging it. Delete it by clicking it and pressing Delete (or the toolbar button). Hold Ctrl / ⌘ and click a marker to jump the playhead exactly to it.
7 · Adjust by hand
You can always move a track yourself — to fine-tune a result, or to place a recording that has nothing to match against.
| To do this | Do this |
|---|---|
| Slide a track along the timeline | Hold Alt (⌥ Option on Mac) and drag the track's sound wave. It snaps to other tracks' starts, ends and markers, and to the playhead; hold Shift as well to turn snapping off. |
| Nudge by one frame | Select the track and press Alt+← / →. |
| Nudge by one second | Alt+Shift+← / →. |
| Set an exact start time | Type the number of seconds into the track's Offset field and press Enter. |
| Undo a change | The Undo button, or Ctrl+Z (⌘+Z on Mac). Redo with Shift added. |
Dragging on the timeline without Alt selects a stretch of time instead — useful for aligning part of an event or exporting just that part. This keeps you from moving a track by accident.
8 · The video views
Every camera appears as a tile in the Video area. Tiles play in step with the timeline.
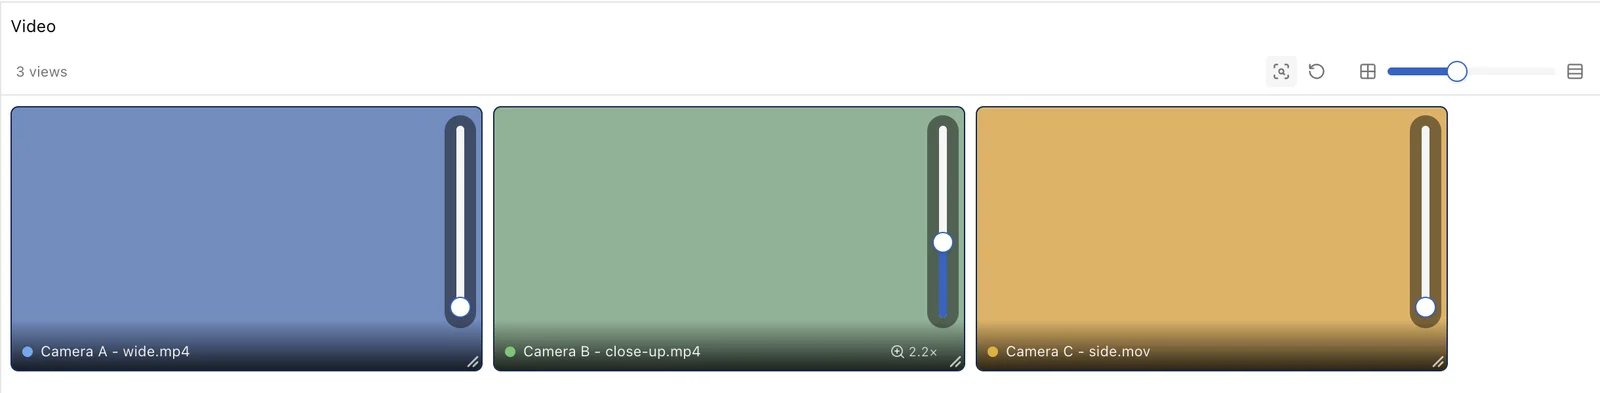
- Make all tiles bigger or smaller with the slider at the top right, or the small/large tile buttons either side of it.
-
Zoom into one view — to
check a detail like a mouth or a hand — by
clicking the magnifier-in-a-frame button to
unlock adjusting, then:
- use the tile's vertical slider, or hold Ctrl / ⌘ and scroll (or pinch on a trackpad) over it;
- drag inside the tile to move around the zoomed picture;
- drag the tile's bottom-right corner to make just that tile bigger (double-click the corner to return it to the shared size);
- double-click inside the tile to undo its zoom.
- Click the magnifier button again to lock the views so they can't be moved by accident. The circular-arrow button resets zoom on every view.
Zooming here only changes what you see in the app — it doesn't affect the exported files.
9 · Export
Exporting writes a new copy of each recording, trimmed and padded so that every file starts and ends at the same instant and is exactly the same length. Where a recording hadn't started yet (or had already stopped), the gap is filled with black picture and silence.
Your original files are never changed.
Choose the part to export (optional)
- Whole project — from the earliest start to the latest end of any recording. This is used if you set nothing.
- In to Out — move the playhead and press I to set the start and O to set the end (or use the flag buttons in the toolbar). Clicking near the start or end of a recording snaps the playhead onto it exactly.
- Selection — drag across the timeline to select a stretch of time.
Run the export
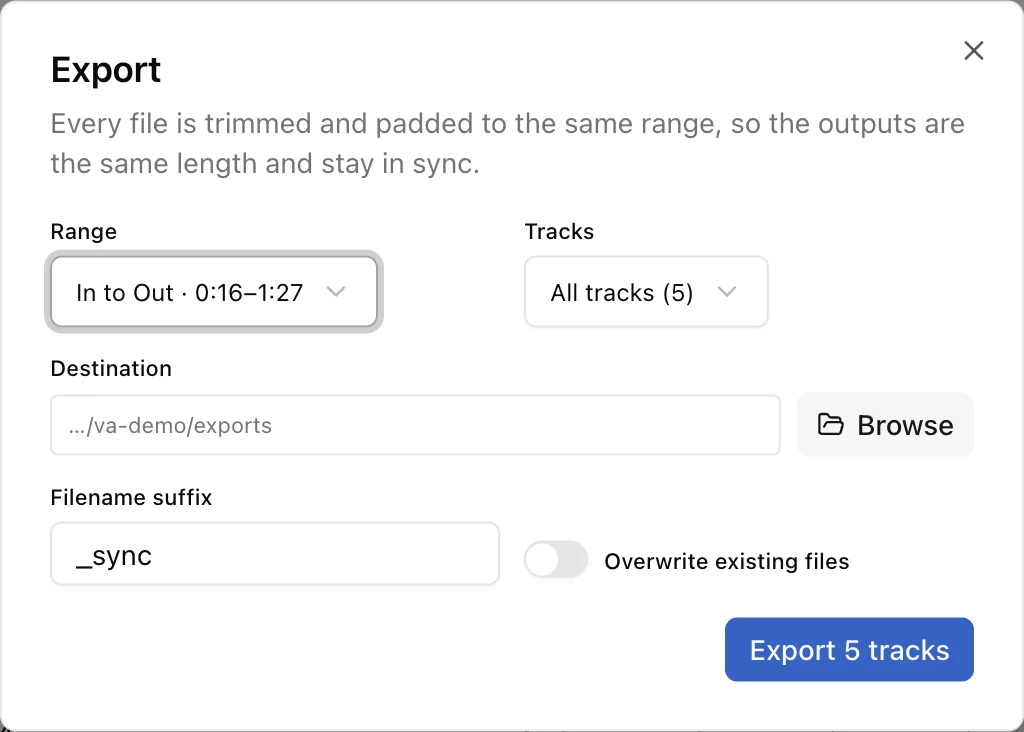
- Click the Export button (upload arrow) in the toolbar, or File → Export….
- Range: choose the part to export. The most specific one you've set is picked for you.
- Tracks: all tracks, only the tracks you've selected, or only the active one.
- Destination: click Browse to choose the folder for the new files.
-
Filename suffix: added to
each original name, so
Interview.mp4becomesInterview_sync.mp4. Turn on Overwrite existing files only if you want to replace an earlier export. - Click Export. Each file's progress and the time remaining are shown. You can close the window — the export carries on and its progress shows in the status bar. Cancel all stops it.
Format & quality for each track
By default each exported file matches its original — same picture size, frame rate and similar quality — saved as a widely compatible MP4 (H.264 video, AAC sound). You only need these settings if you want something different, such as smaller files or a format for a particular editing program.
Click the sliders button on a track's header to open its settings.
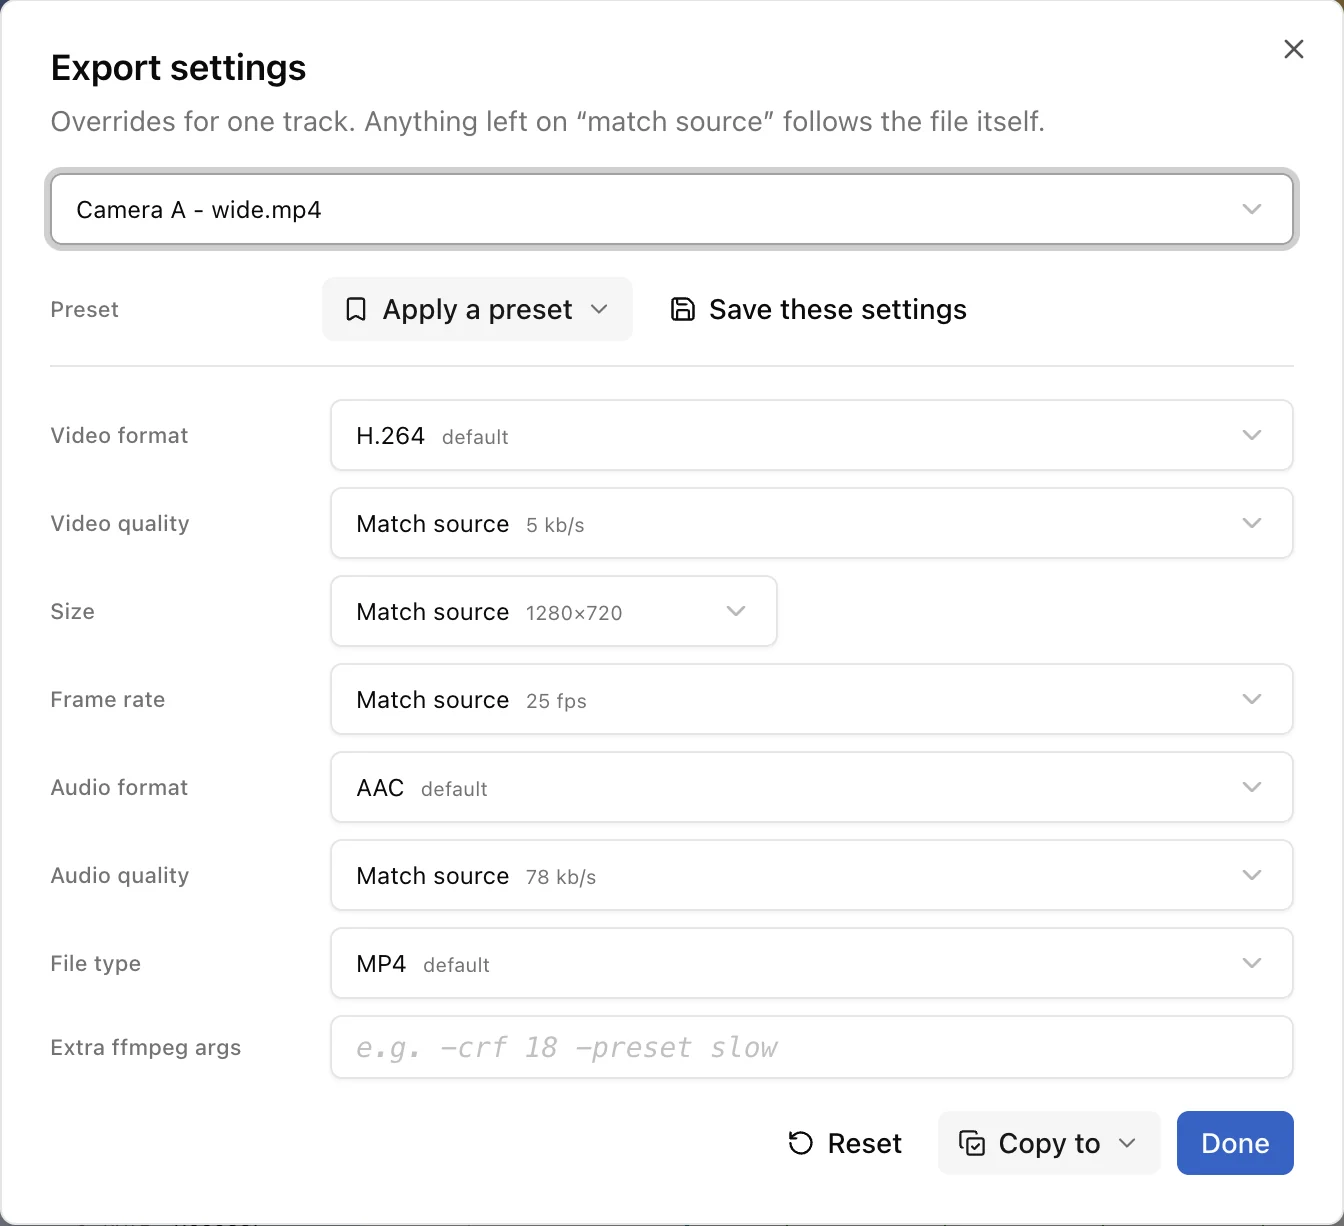
| Setting | Options |
|---|---|
| Video format | H.264 (default, plays everywhere) · H.265 / HEVC (smaller files, slower) · Apple ProRes or Avid DNxHD (for editing software, very large) · MPEG-4 (older devices) |
| Video quality | Match source, or a range of bitrates — higher means better quality and bigger files. Custom lets you type a number. |
| Size | Match source, or Custom to type a width and height. |
| Frame rate | Match source, or a standard rate such as 25 or 30 frames per second. |
| Audio format | AAC (default) · MP3 · Dolby Digital · FLAC (lossless, compressed) · PCM (lossless, uncompressed) |
| Audio quality | Match source or a chosen bitrate. Not needed for lossless formats. |
| File type |
MP4 (default) ·
QuickTime .mov ·
Matroska .mkv · WAV
(sound only)
|
| Extra ffmpeg args | For experts only — leave empty. |
- Copy to applies the same settings to every other track, or to the tracks you've selected.
- Save these settings stores them as a named preset; Apply a preset uses one. Presets are available in every project.
- Reset returns the track to matching its original.
VFR in the Media
list). The app converts these to a steady
frame rate on export so they stay in sync in
other software — no action needed.
10 · Save your work
A project remembers your recordings, their alignment, markers, In/Out points and export settings, so you can come back to it later.
| File menu | Shortcut |
|---|---|
| New Project | Ctrl+N · ⌘+N |
| Open Project… / Open Recent | Ctrl+O · ⌘+O |
| Save / Save As… | Ctrl+S · ⌘+S (add Shift for Save As) |
| Add Media… | Ctrl+I · ⌘+I |
| Export… | Ctrl+E · ⌘+E |
-
Projects are saved as small
.valprojfiles. They point to your recordings rather than containing copies, so keep the recordings where they are (or move the whole folder together). - Autosave keeps a recovery copy of unsaved changes every 15 seconds. If the app closes unexpectedly, it offers to Recover your work the next time it opens. This never overwrites your saved project.
- The app asks before closing if you have unsaved changes.
11 · Preferences
Open Preferences from the app menu on Mac, or File → Preferences… on Windows and Linux (Ctrl+, / ⌘+,). Changes save as you make them and apply to every project.
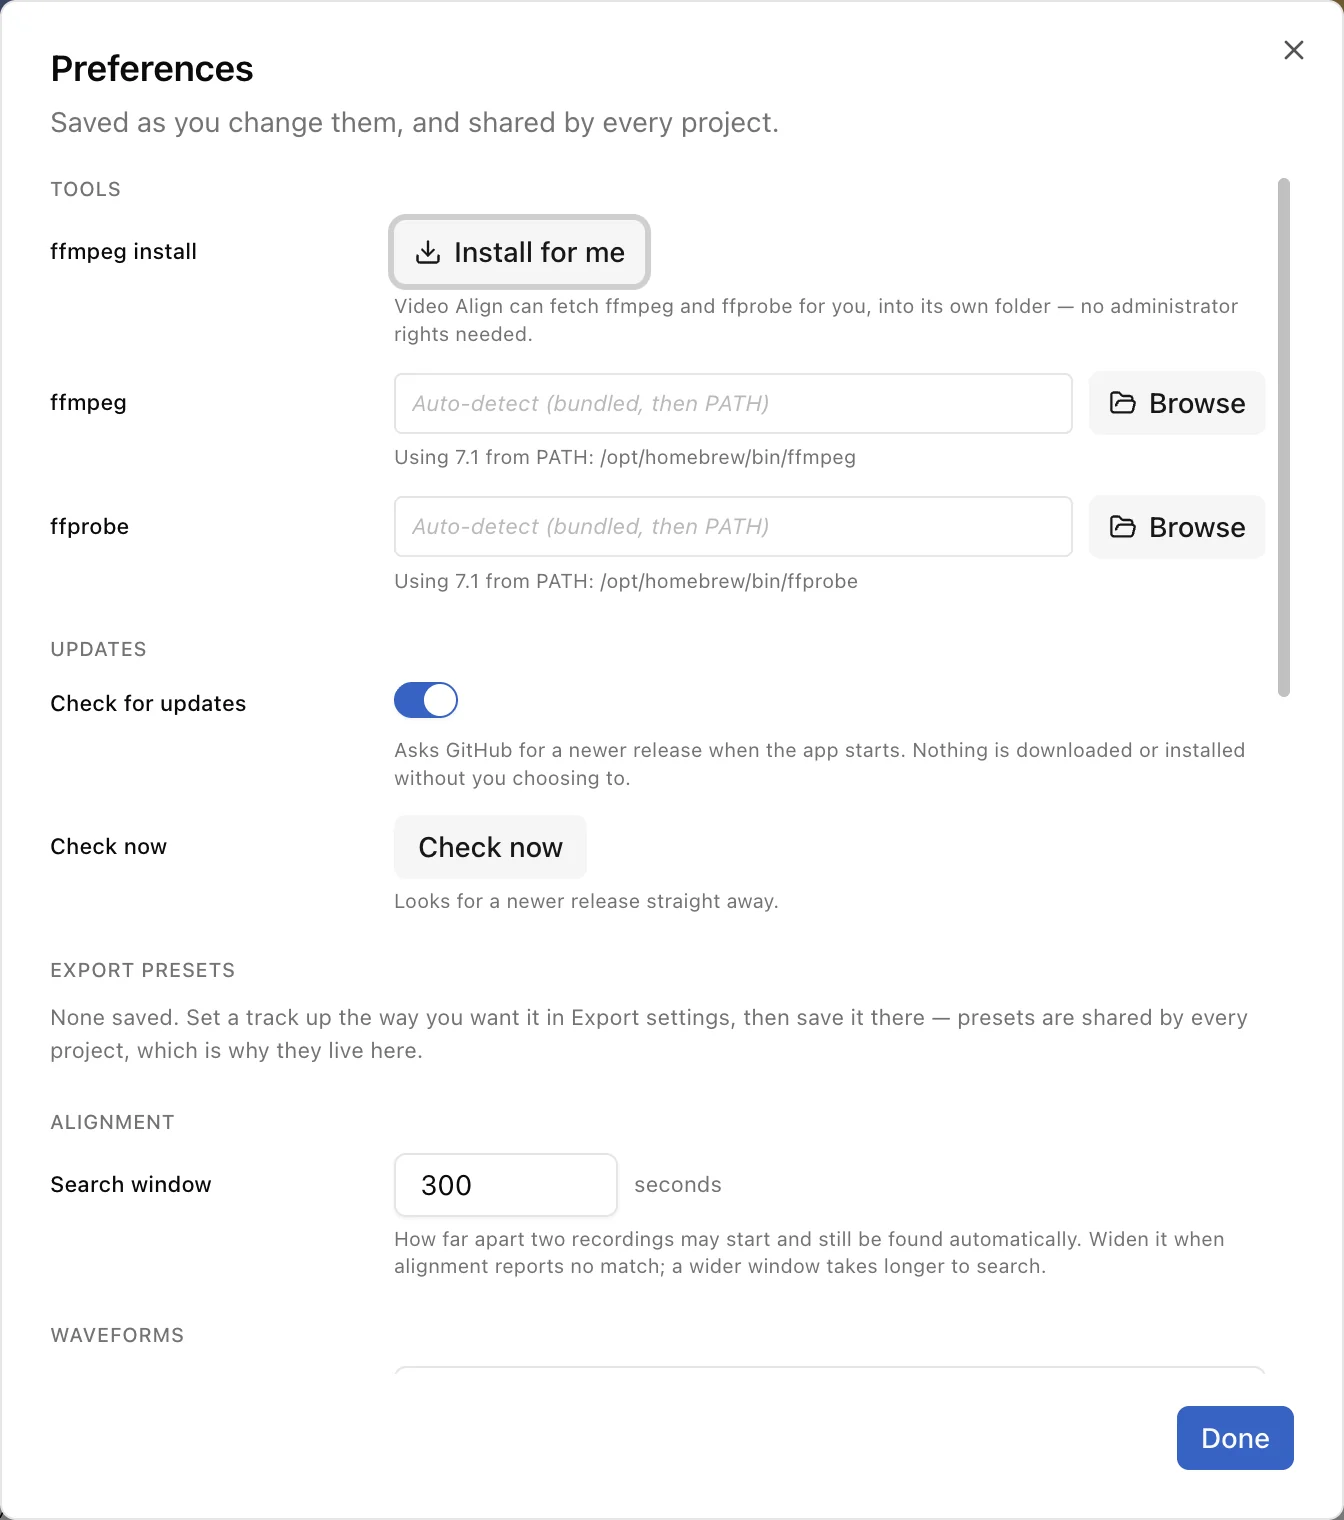
| Section | Settings |
|---|---|
| Tools | Install or reinstall ffmpeg, or choose a copy you already have. |
| Updates | Check for a new version when the app starts (on by default), or Check now. Nothing is downloaded without your say-so. |
| Export presets | See and remove saved presets. |
| Alignment | Search window — how far apart (in seconds) recordings may have started and still be found. Default 300 seconds (5 minutes). Increase it if a recording started much earlier or later than the others. |
| Waveforms | How much detail sound waves show when zoomed in. Higher uses more memory. |
| Export | How many files to export at once, and a default export folder. |
| Projects | How many steps Undo remembers (default 50), and how often autosave runs. |
| Preview proxies | Whether to make preview copies of files that can't be played directly, where to keep them, their size, and a button to delete them for the current project. |
| Appearance | Dark, light, or match your computer's setting. |
12 · Keyboard shortcuts
Shortcuts work while the timeline area is in use — not while a window or text box is open. Press ? in the app to see this list. On a Mac, Alt is the ⌥ Option key.
| Keys | Action |
|---|---|
| Playback | |
| Space | Play or pause |
| L | Play forward — press again for 2×, 4×, 8× |
| J | Scrub backwards — press again to go faster (no sound) |
| K | Stop, and back to normal speed |
| ← / → | Back / forward one frame (hold to keep stepping) |
| Shift+← / → | Back / forward five seconds |
| Home / End | Start / end of the project |
| Markers | |
| M | Add a marker on the active track |
| Shift+M | Add a linked marker on every track at this moment |
| , / . | Previous / next marker, on any track |
| Delete | Remove the selected marker |
| Tracks | |
| ↑ / ↓ | Select the previous / next track |
| Alt+↑ / ↓ | Move the active track up / down the list |
| Alt+← / → | Nudge the active track one frame |
| Alt+Shift+← / → | Nudge the active track one second |
| Export range | |
| I / O | Set the In / Out point at the playhead |
| Shift+I / O | Clear the In / Out point |
| View | |
| + / − | Zoom the timeline in / out |
| F | Zoom to fit the whole project |
| ? | Show the shortcut list |
13 · Troubleshooting
A track wasn't aligned ("left where it was")
- If the recording started more than 5 minutes before or after the reference, raise the Search window in Preferences and align again.
- Make sure the track actually overlaps the reference in time — a recorder that only ran after the reference camera stopped has nothing in common with it. Choose a longer recording as the reference.
- If the sound is very different (another room, heavy wind noise) or missing, sync using markers instead.
The bottom-right corner says "ffmpeg not set up" or "too old"
Click the message and choose Download ffmpeg for me. The app needs ffmpeg version 4.2 or newer.
A video shows black, or "Proxy build failed"
The app couldn't play that format directly and couldn't make a preview copy — often because the folder beside the original is read-only (for example, a camera card). When asked where previews should go, choose Use the app proxy folder. Alignment and export still work either way.
Windows says "Windows protected your PC"
Windows shows this for apps it hasn't seen downloaded many times. Click More info, then Run anyway.
Playing backwards has no sound
That's expected: pressing J steps backwards through the pictures rather than truly playing in reverse.
How do I update?
When a new version is out, a notice appears in the status bar. Click it to read what's new, then Download to open the download page in your browser, and install it over the old version. Your projects and preferences are kept.
Ready to sync your recordings?
Download Media Alignment Tool and line up your first project in minutes.
Download free